
You can store your SSH keys in Bitwarden – and use it from there.

(BTW I recommend to use Vaultwarden for your own local server and just use the Bitwarden Client Apps)
First, activate the SSH agent in the Settings of the Bitwarden Desktop App:
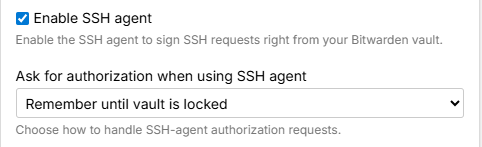
Next run this in a Powershell Admin Console
Stop-Service ssh-agent -ErrorAction SilentlyContinue
Set-Service ssh-agent -StartupType Disabled
winget install --id albertony.npiperelay --exact
This deactivates the Microsoft SSH-Agent and installs npiperelay
Then start your WSL (tested with Ubuntu 22.04.5 LTS, 24.04 LTS and 26.04 LTS)
sudo apt update
sudo apt install -y socat
Now we have to find npiperelay and create a symlink
NPIPERELAY_WIN="$(cmd.exe /c where npiperelay.exe 2>/dev/null | tr -d '\r' | head -n1)"
test -n "$NPIPERELAY_WIN" || { echo "npiperelay.exe not found"; exit 1; }

NPIPERELAY="$(wslpath -u "$NPIPERELAY_WIN")"
printf 'npiperelay: %s\n' "$NPIPERELAY"

sudo ln -sf "$NPIPERELAY" /usr/local/bin/npiperelay.exe
Create the bridge socket script:
cat > ~/.local/bin/bitwarden-ssh-agent-bridge <<'EOF'
#!/usr/bin/env bash
set -eu

SOCKET="$HOME/.ssh/bitwarden-agent.sock"

rm -f "$SOCKET"

exec /usr/bin/socat \
    "UNIX-LISTEN:$SOCKET,fork" \
    "EXEC:/usr/local/bin/npiperelay.exe -ei -s //./pipe/openssh-ssh-agent",nofork
EOF

chmod 700 ~/.local/bin/bitwarden-ssh-agent-bridge
Create a service
cat > ~/.config/systemd/user/bitwarden-ssh-agent.service <<'EOF'
[Unit]
Description=Bitwarden SSH agent bridge to Windows
After=default.target

[Service]
Type=simple
ExecStartPre=/usr/bin/rm -f %h/.ssh/bitwarden-agent.sock
ExecStart=%h/.local/bin/bitwarden-ssh-agent-bridge
Restart=on-failure
RestartSec=2

[Install]
WantedBy=default.target
EOF

systemctl --user daemon-reload
systemctl --user enable --now bitwarden-ssh-agent.service
Adjust the environment
grep -qxF 'export SSH_AUTH_SOCK="$HOME/.ssh/bitwarden-agent.sock"' ~/.bashrc ||
    printf '\n# Bitwarden SSH agent via Windows WSL bridge\nexport SSH_AUTH_SOCK="$HOME/.ssh/bitwarden-agent.sock"\n' >> ~/.bashrc
When you close your WSL now and reopen it, this should show you your keys:
ssh-add -LUpdate
In case you don’t have systemd running, write this into /etc/wsl.conf
[boot]
systemd=true
and then «reboot» your wsl from Powershell with
wsl --shutdown
wsl